Damond Motorsports Fiesta ST Rear Motor Mount Install Guide
Looking to plant power to the ground, reduce drivetrain slop, drastically lessen wheel hop, all while adding minimal NVH? Look no further, Damond Motorsports has the answer in the DM Rear Motor Mount for the Fiesta ST.
Here is our install guide.
WARNING:
By installing this Product, you understand that:
The buyer/user assumes all risk as to quality, performance and use of these products and agrees to hold DD2, Inc. DBA Damond Motorsports (“DM”) and its representatives not responsible for any injury, loss, or damage; including any and all incidental or consequential damages arising from the sale, installation, or use of our products.
Many parts are intended for “OFF ROAD ” and “RACING” applications only. It is suggested that State and Federal emission regulation be checked, to see whether or not this product complies with those laws. Read through the instruction guide thoroughly, before attempting this install. Do not install any components while the engine is running or shortly after the car has been running. Give the car some time to cool down. Failure to install this product correctly, or failure to remove/reinstall existing components correctly, could result in poor running conditions, or even component and engine failure, which the sole user of this product is responsible for. The install instructions are intended to guide you on how to install this product properly. Only an experienced mechanic should perform this install. In addition, DM, and its representatives reserve the right to modify and or discontinue parts without notice. If you the user/buyer of this product do not agree with the above, contact DM immediately, to discuss a possible return of our product for a full refund minus shipping costs, and other fees.
Tools Needed:
- Safe means of lifting and supporting the vehicle: jack and jack stands, wheel ramps, or lift.
- Torque Wrench
- Socket wrench or breaker bar, 3/8"
- 13mm deep socket
- Long or Medium socket extension
- Flathead screwdriver or small hammer

Install:
(CAUTION: allow the vehicle to cool down fully before attempting any work)
Begin by properly supporting the vehicle in the air using stands, ramps, or a lift.
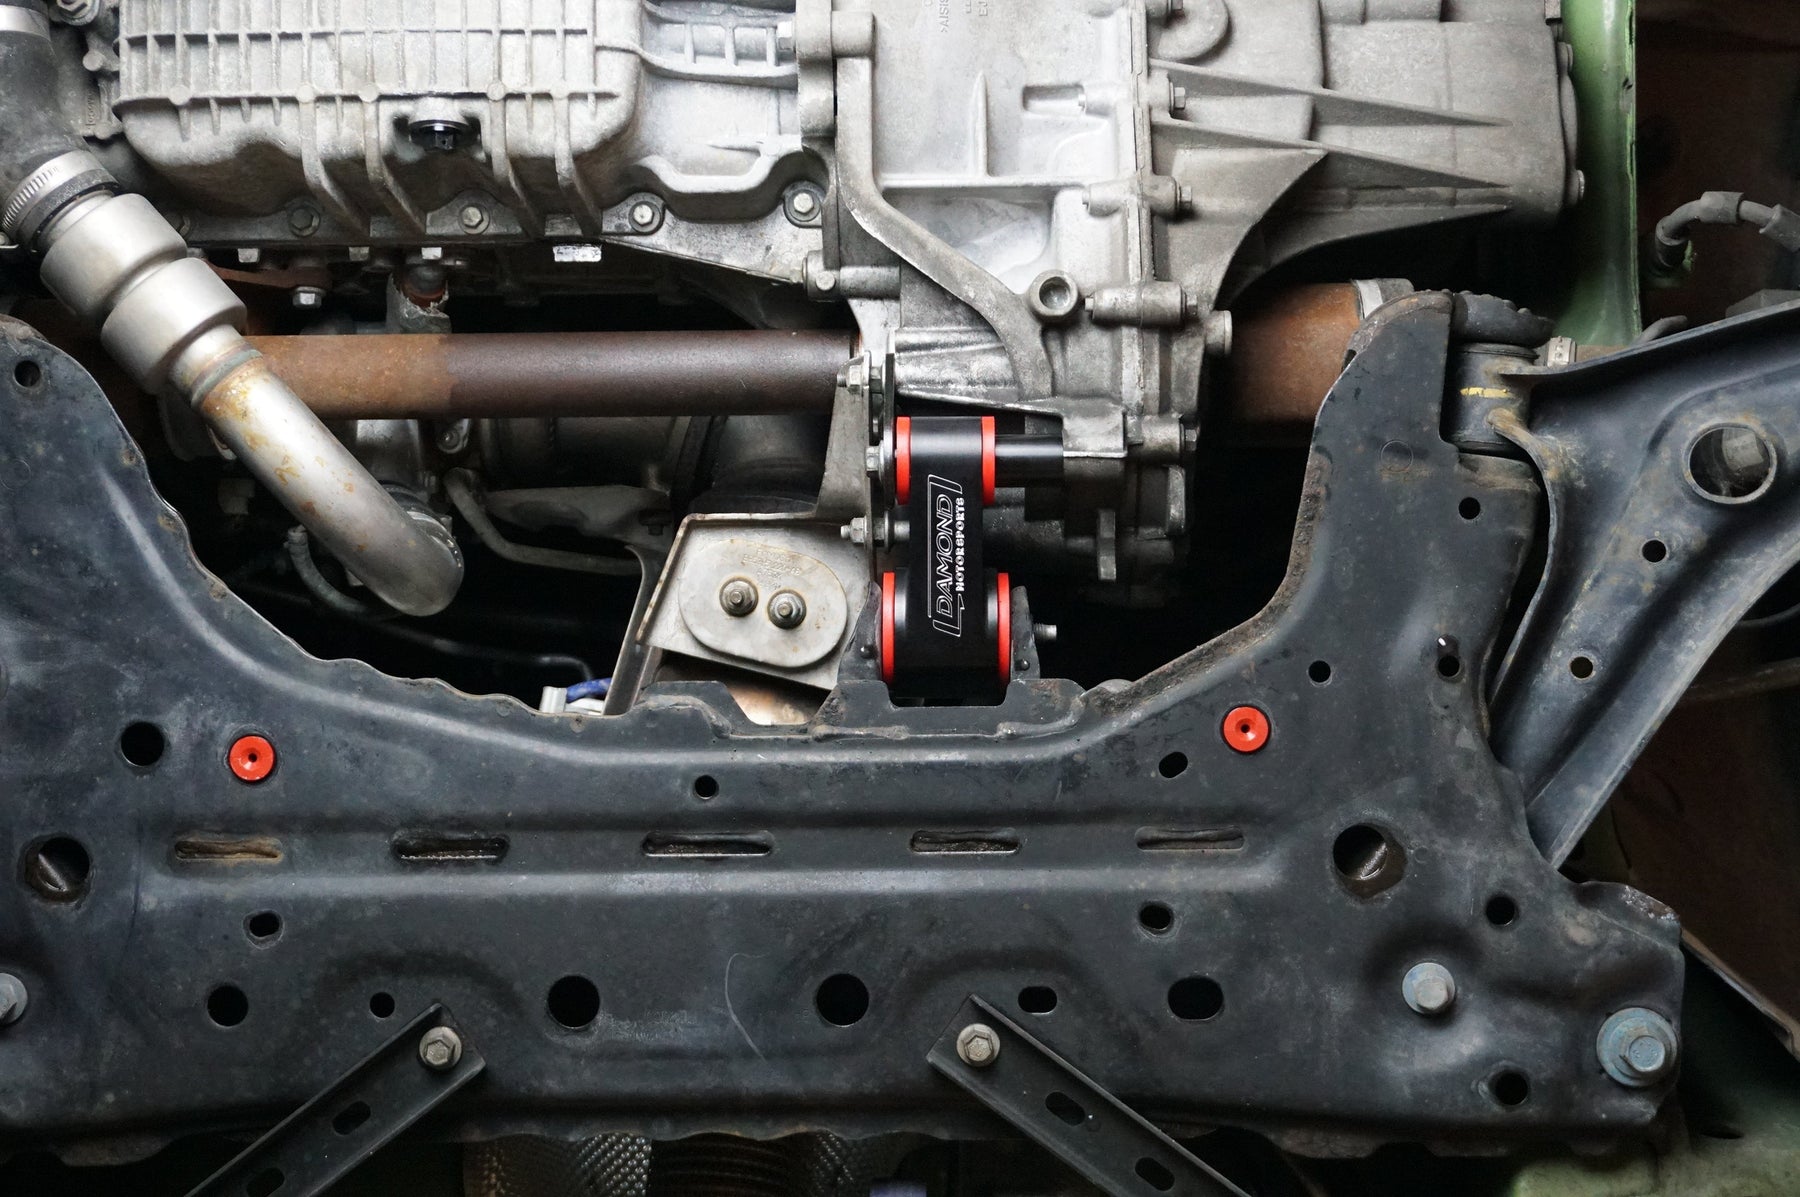
Locate the factory rear motor mount assembly attaching the transmission casing to the subframe.

If equipped, remove the exhaust downpipe support bracket by removing the 4 x 13mm locknuts. Note: The part that attaches to the downpipe is multiple pieces with a plate and 2 sleeves. These sleeves may fall out once the nuts are removed. Set all these components aside, as they will be re-installed.

First break loose all 4 x 13mm bolts shown here. Once the bolts are loosened, remove them, noting the locations of the specific bolts.

Remove the OE rear motor mount from the vehicle.

Use a Flathead screwdriver or small hammer to remove the mounting plate from the OE mount. This piece can be easily pried off or smacked off.

Place the Damond Motorsports mount into position with the rear subframe bolt.

Loosely attach the bracket to the transmission with the 2 x 13mm bolts removed earlier.
While pushing the transmission back by hand, or lightly supporting it back with a jack, align the bottom mounting bracket hole to the front sleeve of the Damond Motorsports mount and the threaded hole of the transmission. Gently thread in the bolt removed earlier, ensuring the threads do not cross.
Tighten the bolts to 45-52lbs/ft in the numbered sequence as shown. It is best to also lightly support the engine during this final torquing.

Finally install the exhaust downpipe support bracket removed earlier, and tighten the 4 x 13mm locknuts in the following sequence to 16-18lbs/ft. Note: it's best to do this sequence in 2-steps, first lightly run down the nuts, then torque to spec. Not doing these bolts in sequence may cause more NVH.

The Damond Motorsports Rear Motor Mount is now installed!
Lower the vehicle, and go for a quick test drive to ensure there's no knocking from bolts not being fully tightened. Note: there will be added NVH immediately upon installing the mount. Generally after 500-1500 miles some of the NVH will subside to a bit lower than immediately after installing the mount. At 100-250 miles we strongly recommend checking the torque of all the fasteners accessible without fully removing the mount.
Congratulations! You've successfully installed the Damond Motorsports Rear Motor Mount. Enjoy all the benefits the mount has to offer on your Fiesta ST.