Damond Motorsports Focus ST Rear Sway Bar End Link Install Guide
A more compact and optimized design for everything from stock cars to slammed rides.
Here is our install guide.
WARNING:
By installing this Product, you understand that:
The buyer/user assumes all risk as to quality, performance and use of these products and agrees to hold DD2, Inc. DBA Damond Motorsports (“DM”) and its representatives not responsible for any injury, loss, or damage; including any and all incidental or consequential damages arising from the sale, installation, or use of our products.
Many parts are intended for “OFF ROAD ” and “RACING” applications only. It is suggested that State and Federal emission regulation be checked, to see whether or not this product complies with those laws. Read through the instruction guide thoroughly, before attempting this install. Do not install any components while the engine is running or shortly after the car has been running. Give the car some time to cool down. Failure to install this product correctly, or failure to remove/reinstall existing components correctly, could result in poor running conditions, or even component and engine failure, which the sole user of this product is responsible for. The install instructions are intended to guide you on how to install this product properly. Only an experienced mechanic should perform this install. In addition, DM, and its representatives reserve the right to modify and or discontinue parts without notice. If you the user/buyer of this product do not agree with the above, contact DM immediately, to discuss a possible return of our product for a full refund minus shipping costs, and other fees.
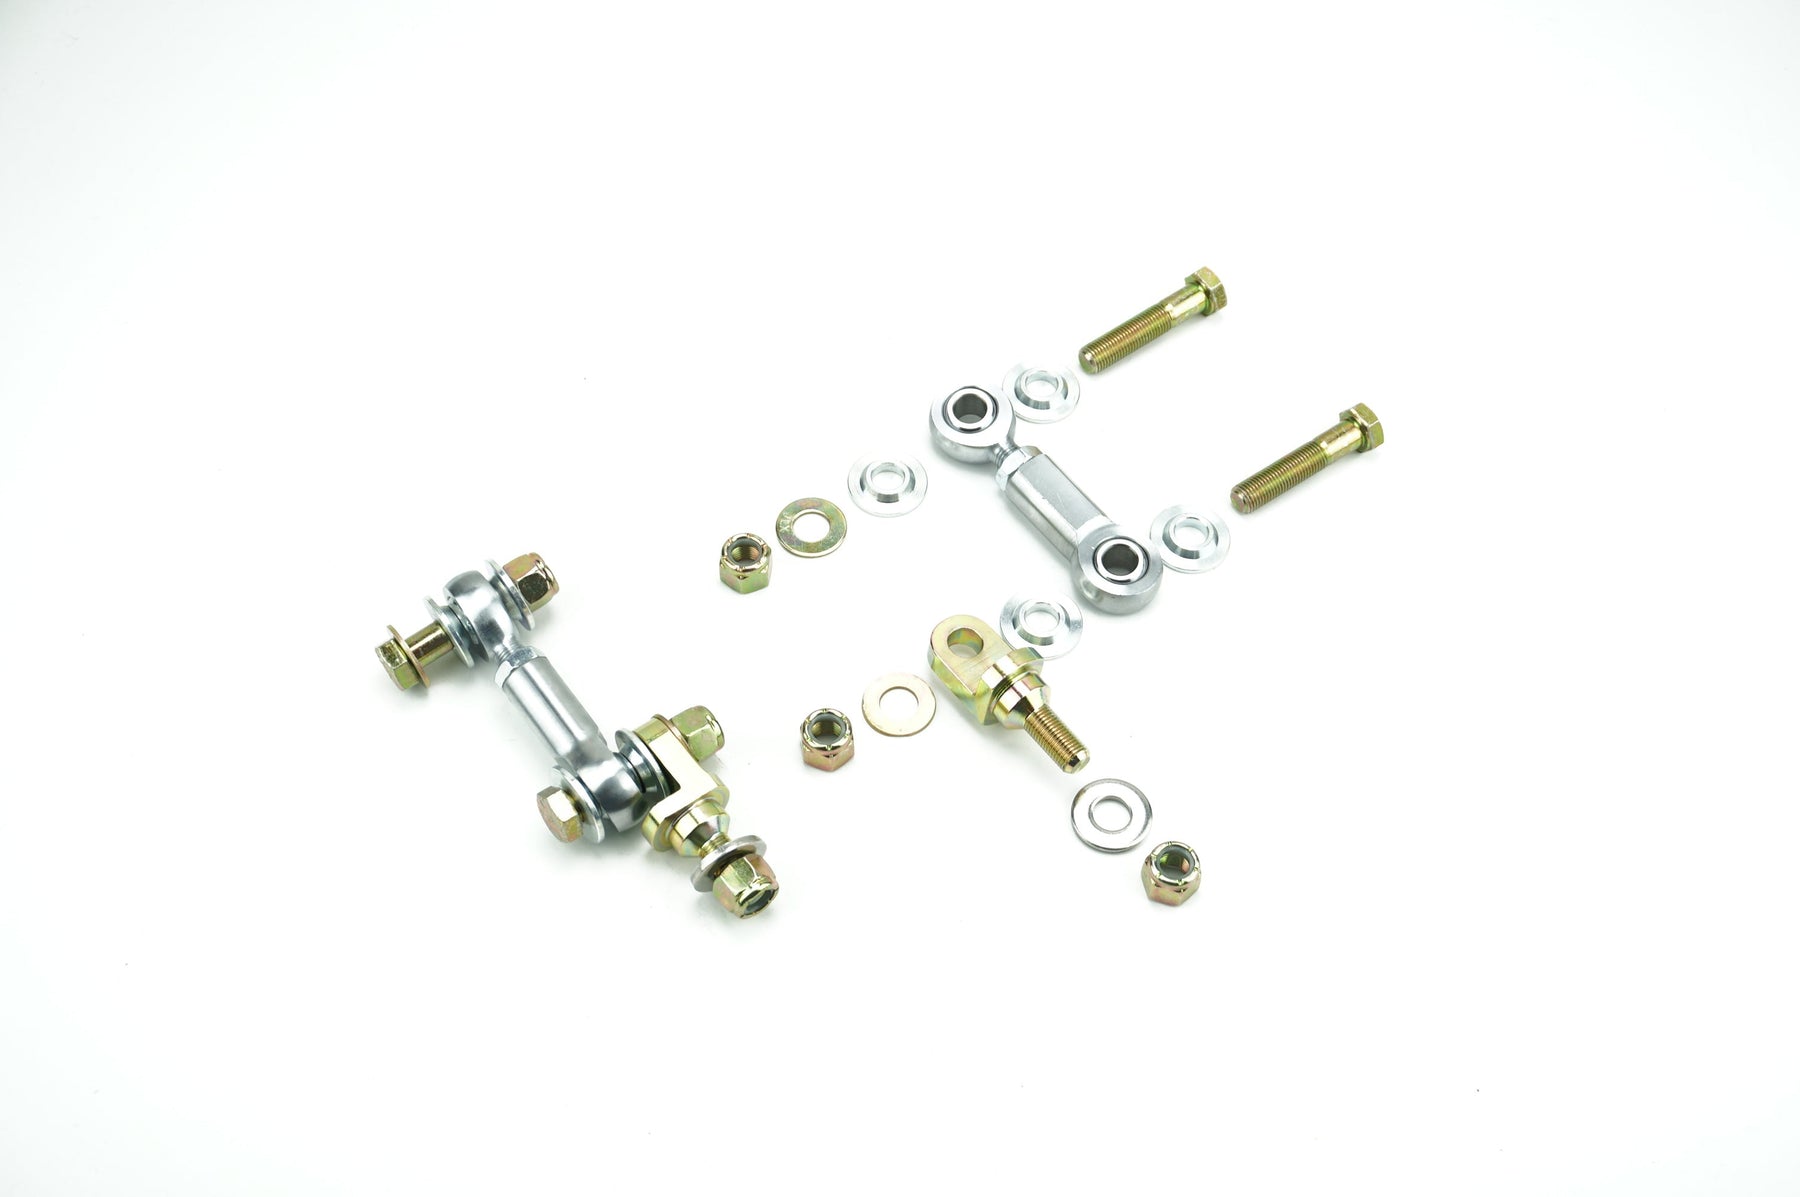
Parts included:
- 8 x misalignment washers
- 6 x 9/16" locknuts
- 4 x 9/16" bolts
- 4 x thin washers
- 2 x male rod end
- 2 x female rod end
- 2 x rod end 9/16" jam nuts
- 2 x eyelet mounts
- 2 x thick washers

Tools needed:
- Safe means of lifting and supporting the vehicle: jack and jack stands, wheel ramps, or lift.
- Torque Wrench
- 1/2" or 3/8" Socket wrench or breaker bar
- 19mm open end wrench
- 14mm wrench
- 13mm open end wrench
- 5mm Allen key
- 9/16" open end wrench
- 9/16" socket
- anti-seize compound
- sandpaper
To begin, prep the vehicle by performing the following:
- Jack or lift the vehicle and place securely on jack stands. If you're running a aftermarket rear sway bar, you can alternative use ramps to drive the rear wheels up onto, and front wheel chalks.
- If you've fully lifted the vehicle off the ground, you can remove the rear wheels for better access/ease of install.
Prep the end link rod ends:
- First we'll roughly prep the length of the adjustable links. The male rod end threads into the female rod end and is secured with the jam nut.
- Adjust the links so that they are approximately 3.75"-4" long from the ends of each rod end. The minimum thread engagement of the male rod into the female rod should 0.55" at approx. 4" We do not recommend running the links short than 3.7"

- Thread the male rod end into the female rod end, and thread the jam nut to where it contacts the female rod end.
- Tighten just 1 of the jam nuts for now. Use a 9/16" wrench on the jam nut and another wrench on the female rod end body. When tightening the jam nut, make sure the rod ends are parallelly aligned with each other as shown.

Step 1, Remove both of the end links:
- Begin by removing the factory or supplied rear end links from the bar. If factory end links, use a 5mm Allen key inserted into the stud and a 14mm wrench around the nut. Loosen with the wrench and keep the stud from spinning with the Allen key.

- If the Allen key way is stripped, you may need to cut off the end link with a grinder or saw
- Next remove the lower portion of the link from the knuckle. Use a 13mm open end wrench on the wrench flats above the bushings, to secure the end link from spinning. Use a 13mm wrench or socket to un-do the lower nut.

- Remove the end link and bushings from the vehicle.
- If aftermarket end links are installed, remove those according to the manufacture's instructions.
Step 2, Install the Damond Motorsports end link eyelet:
- Inspect the knuckle mounting point and remove any corrosion build-up with sandpaper
- lightly apply some anti-seize compound to the knuckle bore
- Insert the supplied eyelet mount into the knuckle as shown, with a 19mm or adjustable wrench around the base of the eyelet. Next take one of the thick washers and a 9/16" lock nuts and secure the eyelet to the knuckle.


- Align the eyelet face so that it is parallel to the sway bar face as shown, with the eyelet offset also being inboard.

- Tighten the lock nut to 15-20lbs/ft
Step 3, Install the Damond Motorsports rod end link to the sway bar:
- Next attach the rod ends to the sway bar as shown.
- Place a washer under the bolt head and push the bolt thru the sway bar mounting hole.
- Next take a misalignment washer and place it onto the bolt with the smaller part of the washer facing the rod end.
- Place the rod end onto the bolt next
- Take another misalignment washer and place it onto the bolt with the smaller part of the washer facing the rod end.
- Lastly thread on a lock nut and tighten the nut to 35lbs/ft

Step 4, Install the Damond Motorsports rod end link to the eyelet:
- Place a misalignment washer under the bolt head and push the bolt thru the rod end, with the smaller part of the washer facing the rod end.
- Take another misalignment washer and place it onto the bolt with the smaller part of the washer facing the rod end.
- Place the bolt thru the eyelet
- Place a standard washer onto the bolt along with a lock nut and tighten to 35lbs/ft on one side of the vehicle only. Leave one side loose to set the preload

Step 5, Set preload:
- To properly set preload, the suspension needs to be fully loaded on level ground. Supporting the lower control arms with jacks, or having the rear of the car on ramps is best, to allow a bit more room to work. However, there is enough room to do this last step on the ground. If doing this on the ground, be sure to roll the car forward and back a little first to allow the suspension to settle.
- Using the one link that's loose, remove the loosely installed lower bolt. If the bolt can go in and out freely where the rod end and the eyelet are aligned, then your preload is zeroed out. If the hole are slightly off you can adjust the length of the link by turning it.
- Once the hole are aligned, install the remaining bolt and tighten to 35lbs/ft.
- Lastly tighten the jam nut on the loose link with a 9/16" open end wrench on the nut and another wrench on the link body. You'll want to try and align the rod ends so that they're even like when initially setting them up.
Step 6, test drive:
Take the car for a brief spin. The rear of the car will feel a bit more connected to the road if coming from the factory style links. There should be no clunks or clicks sounds coming from the rear. If so something may be loose, the rod ends may be misaligned, or the end links and washers were not installed in the correct orientation.